Isnin, 27 September 2021

Cara setting XAMPP akses local host dalam LAN yang sama pada windows 10

 1. Taip Firewall pada kolum carian atau search.

2. Klik Firewall & network protection

3. Klik Allow an app though firewall

4. klik change setting - klik Allow another app - Browse - Local Disk(C) -xampp - apache -bin -open httpd

5. Terpapar Apache HTTP server - klik ok(tick pada private dan public


Step kedua : 

1. Buka Control panel XAMPP 

2. klik config - klik Apache (httpd.xammp)

3.Cari :  

  Alias /phpmyadmin "C:/xampp/phpMyAdmin/"

    <Directory "C:/xampp/phpMyAdmin">

        AllowOverride AuthConfig

        Require local 

        ErrorDocument 403 /error/XAMPP_FORBIDDEN.html.var

    </Directory>


Tukar kepada : 

Alias /phpmyadmin "C:/xampp/phpMyAdmin/"

    <Directory "C:/xampp/phpMyAdmin">

        AllowOverride AuthConfig

        Require all granted

        ErrorDocument 403 /error/XAMPP_FORBIDDEN.html.var

    </Directory>


Ahad, 26 Julai 2020

Cara guna remote desktop tanpa masukkan password

Walaupun anda mungkin dapat log masuk secara manual tanpa kata laluan, windows xp,10 dan sebagainya tidak membenarkan akses jarak jauh secara lalai untuk akaun tersebut. Penyelesaian yang jelas adalah menetapkan kata laluan untuk akaun, penyelesaian lain adalah mengubah tetapan di bawah.

1. Pada this pc atau my computer klik kanan dan pilih properties...klik remote dan pilih 'Allow remote connections to this computer...apply

2. Run gpedit.msc

3. Go to Computer Configuration > Windows Settings > Security Settings > Local Policies > Security Options

4. Set Accounts: Limit local accounts use of blank passwords to console login only = Disabled

*xperlu letak password pada pc cuma sekadar letakan username sahaja
*perlu tahu ip pc dan username yang hendak diremote

Tips format windows 10 pada Dell 3060


  1. Perlu guna windows 10 64 bit format GPT 

  1. Pada Bios tick Ahci

HP PAVILLION 14 Notebook PC masalah touchpad selepas format windows 10

Touchpad click opening up Notifications Center on Windows 10

1. klik search ..taip touchpad

2. klik additional setting

3. Pada menu atau tetingkap Mouse Properties pilih tab Touch Pad

4. klik 'click to change the touch Pad setting

4. Klik Tapping..jangan tanda atau uncheckin 4-finger tapping...klik save

Rabu, 17 Oktober 2018

Cara sembunyikan versi os dalam Apache di Windows


1. Buka folder XAMPP
2. Klik apache -- conf -- extra -- httpd-default.conf
3.Ubah seperti gambar dan save


Selasa, 6 Februari 2018

Cara tambah menu untuk masukkan biss key di dekoder china (kod rahsia)


Pada skrin tekan 9878, Opsyen utama Biss key akan muncul. Pilih Edit dan Twin Protokol akan diaktifkan. Tekan 0 pada remote untuk masukkan biss key.


*dekoder atau receiver ini banyak dijual dalam lazada atau shopee malaysia

Selasa, 23 Januari 2018

Ahad, 13 Ogos 2017

Cara pantas reset windows 8 dan 10

Cara pantas untuk reset windows 8 dan 10 dengan hanya menekan kunci shift dan restart di keyboard.Bila keluar paparan menu klik 'troubleshoot dan klik reset user only/

Rabu, 22 Mac 2017

Laptop HP tidak boleh connect wifi selepas kemaskini windows 10

Also, you can look at the power management for your wireless adapter:
Disable the Power Off option for the adapter:
1. Open Device Manager. (Win Key+R > type devmgmt.msc > OK)
2. Expand the Network adapters.
3. Right click on the Ethernet/Wireless Adapter and click Properties.
4. Click the Power Management tab.
5. Remove the check mark beside Allow the computer to turn off this device to save power.
6. Click OK.
7. Test.
8.Restart

sumber :HP

Rabu, 18 November 2015

Masalah Pendrive keluar arahan perlu di format

  1. Buka 'command prompt' dengan menaip CMD.
  2. Pada command prompt tersebut taip Chkdsk F: /r
  3. Tukar lokasi pendrive anda,jika pendrive anda di H jadikan Chkdsk H: /r
  4. kemudian Enter...
  5. Tunggu sehingga proses pembaikian selesai dan semasa proses ini anda dapat melihat fail-fail anda dipaparkan dan menanyakan samaada anda mahu menyelamatkan data-data tersebut.
  6. jawab Y (Yes)untuk meneruskan pembaikian.
  7. selesai proses pembaikian.

Selasa, 17 Februari 2015

Cara mudah menyatukan dan mengecilkan fail pdf

Anda tentu akan mengalami masalah untuk menghantar email kerana saiz fail yang dihantar terlalu besar.Ada cara yang mudah untuk menyambungkan atau menyatukan dan mengecilkan fail PDF anda sebelum dihantar menggunakan email.

Ikuti langkah dibawah :

1. Buka url http://www.ilovepdf.com/merge_pdf  untuk menyambungkan atau menjadikan fail pdf yang banyak kepada satu fail.
2. Buka fail yang hendak disatukan


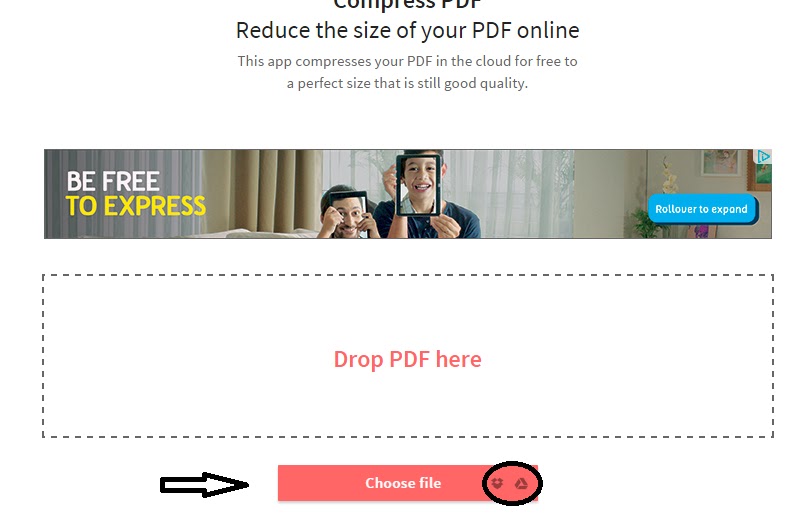
3.Kemudian selesai fail tersebut anda perlu mengecilkan fail PDF tersebut.Buka URL http://smallpdf.com/compress-pdf dan pilih fail yang hendak dikecilkan.Fail juga boleh di buka dari Google Drive anda.


Selasa, 6 Januari 2015

Sistem BIOS Boot keys untuk Laptop atau desktop

System BIOS Boot Keys for Laptops/Desktop PCs

Here is my list of Laptop and Desktop System Boots Codes for various vendors.  It's great if you're a tech and trying to remember what code to use for that particular brand or model of computer. Note that not all keys will work as some models have different key combinations to others.

Acer

ALT + F10 (Acer eRecovery)

Asus

ESC (Boot Selection Menu)
F9 (Asus Laptop Recovery)

Apple (Models 2006+)

Command + Option + P + R (PRAM and NVRAM Reset)
Command + S (Boot into Single-User Mode)
Command + V (Boot with Verbose Status)
Option (Select Hard Drive Boot Volume)
Option + N (Boot Image from Netboot Server)
Shift (Boot into Safe Mode)
C (Boot from CD Drive)
D (Boot from OS/X CD and perform Hardware Test)
N (Boot from Network)

Dell

CTRL + F11 (Dell™ PC Restore by Symantec)
F8 (At PC Startup) -> Repair Your Computer -> Dell Factory Image Restore

EI Systems

F10 (System Recovery)

Fujitsu

F2 (BIOS Setup)
F12 (Boot Menu)

Gateway

F11 or R (Gateway Recovery)

HP / Compaq Desktops

F10 (HP Recovery)

HP Pavilion / Compaq Laptops

ESC (Startup Menu)
F1 (System Information)
F2 (System Diagnostic)
F9 (Boot Device Options)
F10 (BIOS Setup)
F11 (System Recovery)

IBM ThinkPad

F11 (IBM Product Recovery)

Lenovo

Lenovo-OneKey-Button15x15 (Lenovo OneKey Rescue System)
F2 (BIOS Setup)

Packard Bell

F11 (Recovery Program)

Sony Vaio

F10 (VAIO Recovery Wizard)

Toshiba

0 (Zero) (Toshiba Harddrive Recovery Utility)
F2 (Setup Utility)
F8 (Advanced Boot Options Menu)
F12 (Boot Menu)

credit: https://www.desertcrystal.com/bootkeys

Selasa, 17 Jun 2014

Panduan tentang resolution Projektor

Buyer's Guide to Business Projectors: Resolution

The amount of data that can be displayed on the screen at any given time is determined by a projector's resolution. Resolution is an indicator of the number of pixels the projector uses to create the image. The more pixels it uses, the higher the resolution.

Resolution is usually quoted in two numbers, such as "1024x768," where the first number refers to the pixels from side to side across the screen, and the second number refers to the pixels from top to bottom.

Resolution can be quoted in other ways, as well. For example, 1024x768 is also known as XGA, for eXtended Graphics Array. This terminology is primarily used for computer monitors, but extends to projectors as well. Since there is little rhyme or reason to this naming scheme, the only way to learn it is memorization. Common resolutions will be discussed later in this article.

When speaking of a projector's resolution, it is common to refer to "native" resolution. If a projector's native resolution is 1024x768, that means that the actual number of physical pixels on the display is 1,024 pixels per horizontal row by 768 pixels per vertical column.

How much resolution do I need?

High-resolution projectors are able to show more picture details than low resolution projectors. Since there are more pixels used to make the image, each individual pixel is smaller, so the pixels themselves become less visible on the screen. However, you will generally pay more for higher resolution.

Lower resolution projectors are much less expensive, and they can produce images that are just as bright and attractive as higher resolution machines. Unless you have a need to display fine detail, lower resolution products will be your best bet from a cost perspective.

Resolution options

Some basic choices for native resolution include the following:

    SVGA (800x600) - SVGA projectors are great for those on a tight budget, since prices have dropped dramatically in recent years. While most computers still output in higher resolution, SVGA can be a good option for Powerpoint presentations or other applications that are not heavily dependent on detail.
    XGA (1024x768) - XGA projectors have come down in price over the past few years, and have become the budget standard. Many laptop computers still output in native XGA, and matching an XGA projector to your native XGA laptop ensures you won't lose any detail.
    WXGA (1280x800) - WXGA projectors are widescreen, and usually a bit more expensive than XGA. These products are targeted for use with mid-range widescreen laptops, which often use 1280x800 natively. They are becoming increasingly common and are used as an inexpensive widescreen alternative to XGA.
    SXGA+ (1400x1050) - SXGA+ projectors are becoming more popular, and there are several offerings available in both budget and high-end configurations. SXGA+ resolution is useful for detailed photography and data graphics, but overkill for text display or Powerpoint presentations.
    UXGA (1600x1200) - UXGA is for very high resolution workstation applications that are detail or information intensive. These are expensive projectors that support a broad range of computer equipment. Relatively few products on the market have this native resolution.
    WUXGA (1920x1200) - WUXGA is the widescreen 16:10 version of UXGA and can be thought of as a "taller" 1080p. WUXGA projectors have the advantage of being able to natively display 1080p HD signals in addition to WUXGA content, but are also typically quite expensive.

Which resolution is right for you?

One of the key factors in choosing the right resolution is your typical application. Do you have a need for very accurate display of small visual details, or are you looking for a general presentation tool for text and small graphics?

If your primary use of the system is for Powerpoint presentations, charts, graphs, and general business display, you probably don't need to pay extra for very high resolution equipment. SVGA or XGA resolution projectors are perfect for this kind of work, and the best solution for the money. WXGA is a good widescreen option, if required.

If you are projecting engineering drawings, digital photography, complex Excel spreadsheets, or other images of a highly detailed or technical nature, you will probably need a projector of SXGA+ resolution or higher to produce an acceptable image for your purposes.

Matching your computer to your projector

Keep in mind that the best resolution for your projector is often the resolution of the computer you intend to use with it. Laptops in particular can sometimes have a maximum resolution identical to the native resolution of their built-in display. Desktop computers are more likely to have many options for output resolution, which can open up your choice of projectors.

If you typically use a notebook computer with XGA resolution, you will want a projector with the same native XGA resolution in order to get the sharpest and cleanest image. Similarly, if you normally use a laptop with higher than XGA output, such as SXGA+, you will get the best picture from a projector that has the same native resolution. If you use a desktop computer with a range of possible resolutions, choose the resolution most appropriate for the content you want to display.

Projectors on the market today are capable of projecting input signals other than their native resolutions. For example, you can almost always hook up an XGA laptop to an older SVGA projector. The projector will automatically convert the incoming 1024x768 signal to its native 800x600 output. However, there is always a loss of sharpness and detail in the process, so you will end up with a picture that is not as sharp or clear as it would be if the incoming signal had been in the projector's native resolution.

This loss of sharpness also happens if you plug an XGA computer into a higher-resolution SXGA+ projector. You will usually get a decent image, but the conversion from 1024x768 input to a 1400x1050 output will produce some softness that you may not appreciate after having spent the money for an SXGA+ projector. The loss in quality incurred by making a large resolution smaller is generally less severe than that incurred by making a small resolution larger.

Ahad, 14 Julai 2013

Auto Log In Windows 7

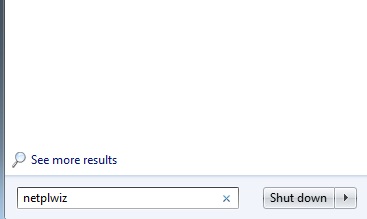
Jika Windows XP command atau arahan yang digunakan adalah  control userpasswords2,Windows 7 pula berbeza sedikit iaitu arahannya adalah netplwiz.

Cara untuk log secara automatik win 7 adalah seperti

  1. taip arahan netplwiz di bahagian search program and files.Akan keluar paparan seperti berikut.


2. Buang tanda pada Users must a enter name and password to use this computer.Masukkan password yang telah di setkan.

3. Klik OK dan Apply.

4. Reboot kembali komputer anda.

Khamis, 9 Mei 2013

Khamis, 25 April 2013

Kod warna Panel Switch Acer Veriton M460

Biru + Putih = Power Switch

Merah + Putih = Hardrive Activity LED

Hijau + Putih = Power LED

Merah + Hijau Muda = LAN LED

Kedudukan untuk Motherboard Gigabytes GA-G41M-Combo :

Khamis, 11 April 2013

Kod warna Panel Switch Acer Veriton M480

Power Switch = Biru dan Kuning

Hardisk Activitiy LED = Merah dan Putih

Power LED = Coklat dan Hitam

LAN LED = Hijau dan Oren

Kedudukan untuk Motherboard Gigabytes GA-G41M-Combo :


Ahad, 3 Februari 2013

Bagaimana Boot menu atau bios Sony VAIO Ultrabook

Hari ni pening cari macamana nak boot cd Notebook Sony Vaio T Series Model SVT141A11W.Cari punya cari jumpa jugak caranya.
  1. Shutdown notebook...
  2. Tekan butang Assist...
  3. Paparan menu akan keluar,pilih sahaja menu yang dikehendaki
Sony Vaio ini juga menyediakan dua cara untuk boot iaitu UEFI dan legacy.Default untuk Sony Vaio ini adalah UEFI dan jika ingin mengunakan boot cara lama tukar UEFI kepada Legacy.Selepas tukar ke mode legacy untuk boot cd tekan F2 sahaja.

Selamat mencuba...

Tips : Sony

Isnin, 21 Januari 2013

Keyboard windows shorcut

  • window2Win(logo) » to open start menu , untuk menampilkan start menu

    window2Win+R » to open Run dialog box, membuka dialog RUN
  • window2Win+M » to minimize all opened windows, untuk minimize semua program yang sedang aktif/dijalankan
  • window2Win+Shift+M » to maximize all opened windows, untuk maximize semua program yang sedang aktif
  • window2Win+L » Back to login page (programs is still active), Kembali ke tampilan login (kondisi program masih aktif)
  • window2Win+E » to open My Computer , untuk membuka jendela my computer
  • window2Win+F » to open search options , untuk membuka tampilan search
  • window2Win+U » to open Utility Manager , untuk membuka utility manager
  • window2Win+D » to view desktop/minimize all windows , untuk menampilkan desktop
  • window2Win+F1 » to view windows help page , untuk membuka windows help
  • window2Win+Pause » to view the System Properties dialog box , untuk membuka properti sistem
  • window2Win+Tab » move through taskbar programs , untuk pindah ke program yang lain yang sedang aktif